

Courtesy of Betina Goldstein and Sundays polish…
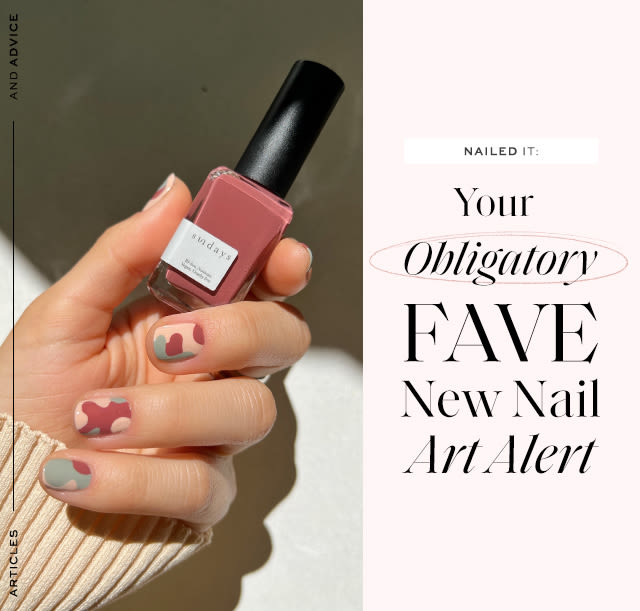
When I asked nail artist Betina Goldstein to try her hand (no pun intended) at an exclusive nail art design for Free People, I had no idea what she’d come up with – besides an undoubtedly tasteful, minimal, bordering-on-elegant design.
With five shades of Sundays nail polish to choose from – all non-toxic and subtly striking – Betina soon got to work. And we waited. But only for a short while…
With five shades of Sundays nail polish to choose from – all non-toxic and subtly striking – Betina soon got to work. And we waited. But only for a short while…
To put it plainly, Betina’s creation was all that I expected, and then some. Her inspo?
"
I wanted the shapes to have movement and fluctuation to reflect the organic textures and feel of Free People. I was inspired by the way their textiles play with combinations of colors that mimic nature.”
I’m tempted to liken her design to Jean Arp-meets-camo. But the beauty of Betina’s art – and all art in general – is really to interpret it for yourself. So…take a moment and meditate on this glorious design. What does it mean to you? And more importantly, wouldn’t it look GREAT on your hands?
As you envision yourself flashing this unique and very cool look on your next date/workout/Zoom-or-in-person meeting, I’m going to share a few pro tips from Betina Goldstein about optimizing your nail polish application.
And make sure to check out the video below as Betina works her true magic.
Betina Goldstein’s Pro Application Tips
Tip #1: Apply the color you wish to cover more of the nail. It’s easier to use a detailer brush on the smaller design details than larger surface area.
Tip #2: Make sure your base color is completely dry before starting your design.
Tip #3: Make sure to clean your brush between strokes. Over time, nail polish dries in your brush, making it difficult to create crisp lines and shapes. Cleaning your brush between strokes helps solve that issue.
Tip #4: Using a piece of tin foil as a palette, apply a small drop of polish on the tinfoil and dip your detailer brush into the polish.
Tip #5: When you dip your detailer brush into the polish, drag the brush to coat the bristles, coating the bristles evenly. This will help give you a precise and smooth application.
Tip #6: When applying the top coat, make sure the polish is completely dry. No need to apply too much pressure, which could smudge your nails and make the polish bleed, leaving streaks.
Watch Betina At Work, in the video below.
Need More Tips For Your Tips?
More To Read
BEAUTY CHRONICLES
These 3 Things Make My Skin Feel Like It’s Springtime
Hello moisture, my old friend…
FP HOROSCOPES
The Universe Is Feeling Generous This Month
Meaning, NO retrograde…anywhere!
FP UPCYCLED
Make A DIY Pillow, With Nicole McLaughlin
Don’t sleep on this fun project…or do!